For my current D&D campaign I am maintaining a World Anvil site, both for my own reference and for my players. Recent events in the game have led to the start of a war, and I wanted a way to indicate what territory was currently being contested by two of the factions. Prior to consulting the available tools I settled on a cross-hatched overlay, that could be clicked on to bring up a summary of the conflict.
Unfortunately, while World Anvil provides the option to add polygon markers to a map, there is no built in way to style them beyond the border and fill colors/transparency. While a custom CSS class can be created and applied to the marker, there is also no way (that I could find as of 2020-06-15) to create a cross-hatching pattern for them with pure CSS.
As you can probably guess from the existence of this article though, I did find a way to create the effect I wanted. The method, which I’ll explain here, is actually quite powerful, and would allow for far more complex patterns than simple cross-hatching.
Before I start, however, I do want to warn you that the method does require a Grandmaster level subscription. I already had such a subscription, and for me it has been money very well spent, but it may not be worth it if this is the only thing you’re hoping to get out of it.
The Plan
The Polygon Markers (as well as Circle Markers) in World Anvil are implemented as an inline SVG. Each marker is rendered as a <path> tag in a big SVG. (The SVG can be found in a div with the classes ‘leaflet-pane’ and ‘leaflet-overlay-pane’, if you want to look it up in the dev tools).
Some quick googling reveals how to apply a pattern as a background for an SVG element by creating a pattern:
<pattern id="patternName">{some SVG elements}</pattern>Then applying it to the SVG element in place of a color for the fill:
<path fill="url(#patternName)"></path>So, we need to figure out how to create a pattern, get it somewhere it can be accessed by the SVG element used for the polygon marker, then apply it to the marker.
Applying the Pattern
Applying the pattern is fairly straightforward. The “FILL COLOR” field on the marker editor has a length limit, so we can’t do it there, but we can over-ride the fill with a custom CSS class. First, when creating the Polygon, we set the “UNIQUE CSS CLASS” to something descriptive. I used ‘hatched-fill-red-blue’:

I also set the “FILL COLOR” to a reasonable default, just in case the SVG doesn’t render correctly on all browsers, so we have a fallback. Since I wanted red and blue stripes, I set the “FILL COLOR” to ‘purple’.
Next we’ll need to go to the Style tab in the Settings & Tools > Configuration section:

Then we’ll create a style that overrides the “FILL COLOR” value we provided previously. We’ll go ahead and assume the name of the pattern will match the name of the class, but camelCase it to remove the hyphens:
.hatched-fill-red-blue {
  fill: url(#hatchedFillRedBlue);
}
The CSS needs to be put in both the “PRESENTATION CASCADE STYLESHEETS (CSS)” and “AUTHORING PANEL CASCADE STYLESHEETS (CSS)” text boxes. The former controls how the class will look from the presentation view (what your players/subscribers/etc see), and the latter controls how the class will look from within the editor:

Creating the Pattern
So now we have the pattern applied, but if we load the map now you’ll see that, since the pattern doesn’t exist yet, we don’t get any fill at all:

Now the trick – in order to add a pattern, we have to inject HTML onto the page. Fortunately, there’s an interesting catch to patterns applied to SVGs in HTML this way: they don’t have to be part of the same SVG tag where they’re used. We can create a custom marker and use it to inject some manually written HTML, and while it won’t end up in the same SVG as the path, we can still reference any patterns we create in it.
First, here’s the HTML I’m using to create a simple cross-hatched pattern to apply to the marker:
<svg>
  <defs>
    <pattern id="hatchedFillRedBlue" width="10" height="10" fill="red" patternTransform="rotate(45 0 0)" patternUnits="userSpaceOnUse">
      <rect width="10" height="10" style="fill:rgb(255,0,0);"/>
      <line x1="0" y1="0" x2="0" y2="10" style="stroke:rgb(0,0,255); stroke-width:10"/>
    </pattern>
  </defs>
</svg>
One quick caveat, if you try to apply this in a custom marker as is, the map will throw an error, and may not load at all. The trick here is that the custom markers, as of 2020-06-15, don’t support multiple lines. I fed the above code into a HTML minifier online and got the following back:
<svg> <defs> <pattern id="hatchedFillRedBlue" width="10" height="10" fill="red" patternTransform="rotate(45 0 0)" patternUnits="userSpaceOnUse"> <rect width="10" height="10" style="fill:rgb(255,0,0);"/> <line x1="0" y1="0" x2="0" y2="10" style="stroke:rgb(0,0,255); stroke-width:10"/> </pattern> </defs></svg>Now we can go create a new custom marker and put that HTML on it by clicking the “Add special HTML marker” buton:

Final Touches and Results
The marker has to be visible for this to work, so I edited the marker after creating it, and moved it to -100,000 x -100,000 so it wouldn’t look ugly on the map. I also set the opacity on the polygon marker’s fill to about 30%, so you could still clearly see what was under it. If you wanted, you could also make just parts of the pattern transparent, and let the rest cover the map entirely.
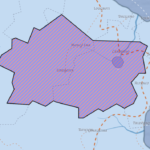
With all this in place you should see the cross-hatching pattern filling the polygon marker:

tl;dr
In short, any custom SVG pattern can be applied as a fill for a polygon marker by:
- Creating the custom pattern in an <svg><def><pattern id=”id”></pattern></def></svg> structure as a custom marker.
- Creating a custom class which sets the “fill” to the name of the pattern created in step 1: “url(#id)”
- Applying the custom class to the polygon marker